DeBasher

DeBasher
Introduction
DeBasher is a workflow system whose processes are Unix programs. Each process is written in the language its author prefers (Bash, Python, R, Perl or Groovy), takes its inputs and gives its outputs through named options, and the way options connect across processes defines the dependency graph that DeBasher schedules and runs, on one machine or on a Slurm cluster. Programs are built in a visual editor, with the help of an AI assistant, written by hand as Bash modules, or described in Python with the SDK.
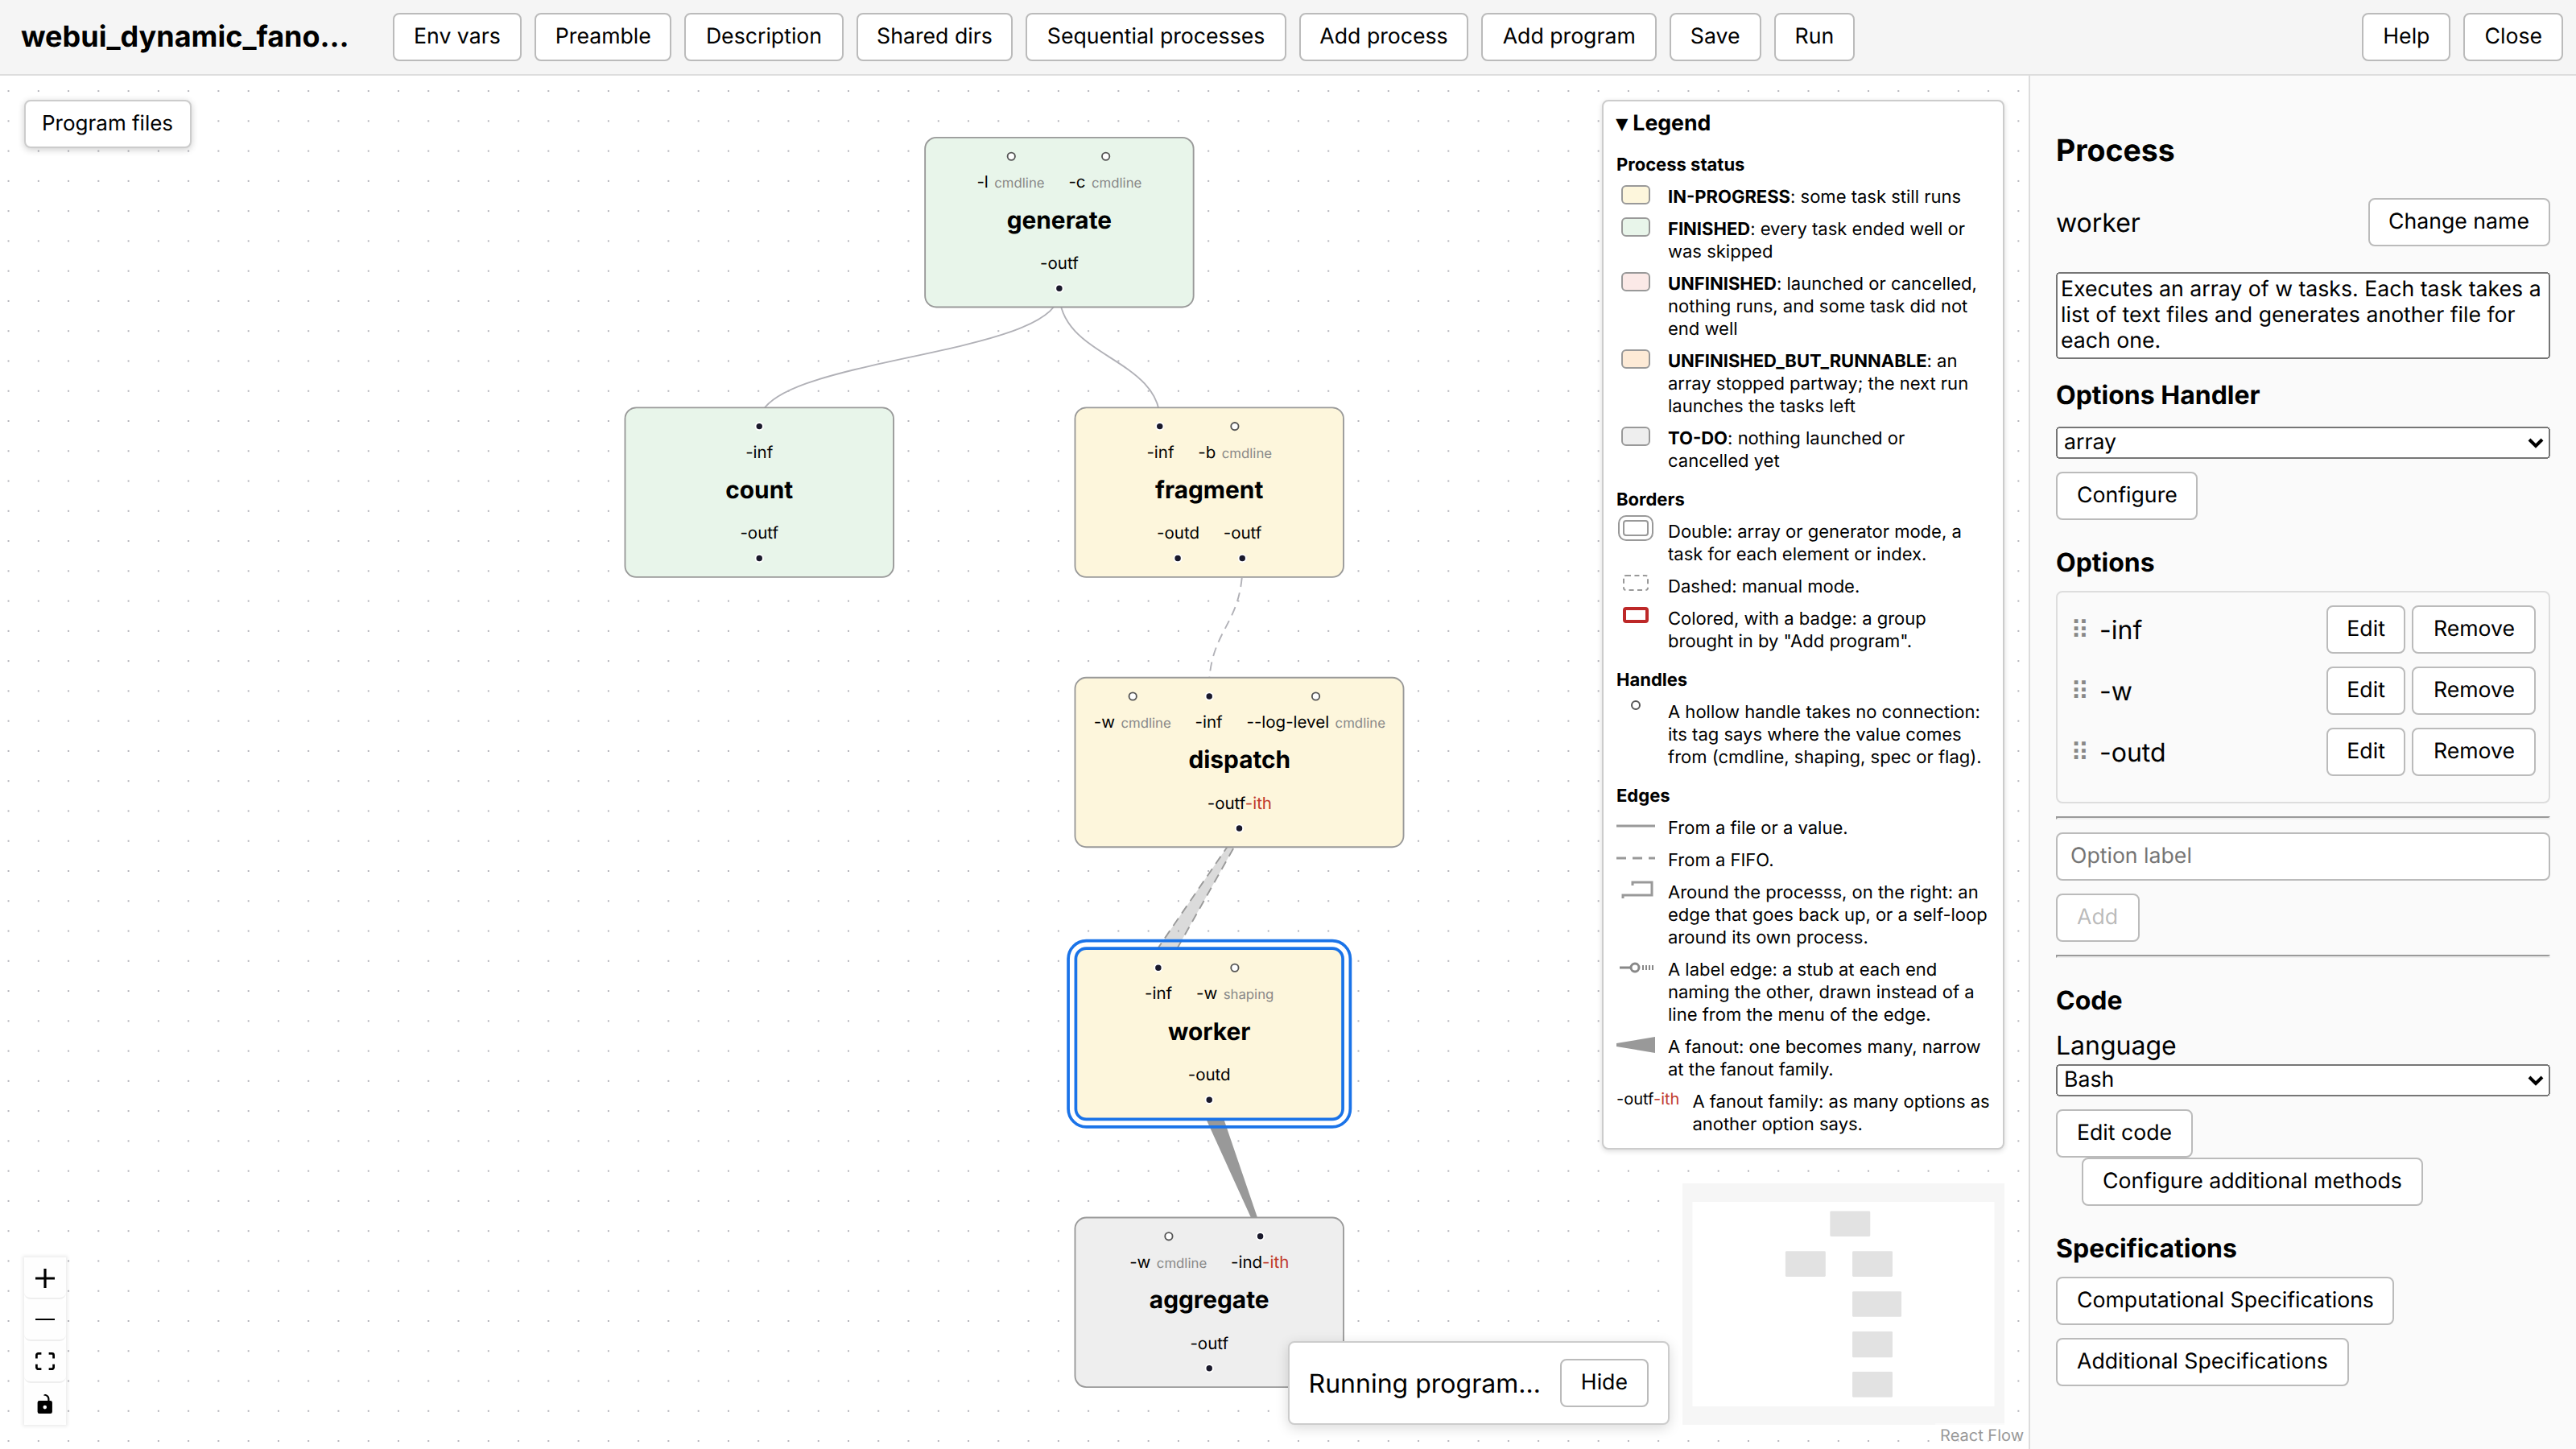
A program running in the web interface: a file is cut into fragments that a dispatcher streams through FIFOs to a pool of workers.
DeBasher runs two kinds of program. A general program processes a batch of inputs and ends. A resident program processes a stream: long-lived, stateful processes exchange messages through FIFOs, in cycles when needed, survive crashes, and can launch a general program for each request they receive. Both kinds define their processes the same way.
DeBasher follows flow-based programming, where a program is a network of black box processes with well defined connections, and keeps what the shell does best: a process is a black box with a command-line interface, so any program that takes its inputs and leaves its outputs through options, files or FIFOs can be one. Workflows, or pipelines, are its typical use, in bioinformatics among other fields.
The DeBasher software package was created and is currently maintained by Daniel Ortiz-Martínez. Daniel is an experienced machine learning researcher and also holds an MSc degree in Bioinformatics.
Features
What DeBasher shares with similar tools:
- Processes written in Bash, Python, R, Perl or Groovy, mixed freely in a single program.
- Processes run concurrently as their data dependencies allow, and a new run repeats only those that failed or are pending.
- A built-in scheduler for a single machine, and Slurm for clusters; static scheduling keeps programs of thousands of processes efficient.
- Conda environments and Docker containers, for reproducible results.
- A visual editor to build, run and observe programs from a browser, with AI assistance.
- Programs saved as a readable
program.yamland one file per process, which the editor, the Python SDK, an AI agent or a text editor all write, and git versions.
What most of them do not have:
- Data streamed between processes through FIFOs, and cycles between processes.
- Interactive workflows, which take input written into them while they run.
- Programs built out of other programs, loaded as modules or launched as batch runs on request.
- Resident programs, whose processes keep their state and are fault tolerant:
- a process that crashes is relaunched and returns to the state it would have had without the crash, while the others keep running;
- consistent snapshots of the state of every process, taken at any moment;
- orderly stop of a whole program, and resumption later from where it stopped;
- failures detected and reported, never silent;
- processes that observe the outside world, such as a directory where files arrive, and processes that launch a general program for each request they receive.
Web Interface
The DeBasher web interface lets you build a program without writing
its module by hand: each process is a box on a canvas and each
connection an edge between two of them. The web interface saves the
drawing as the program, a topology file, program.yaml,
and one file per process with its code, builds from them the DeBasher
module that runs it, runs it with the tools of DeBasher, colors each
process by its status as the run goes on, and lets you inspect what
each process left and talk to the FIFOs of a running program. It
supports both general and resident programs, opens a program written
by the SDK or kept in a repository, and can also import a module
written by hand.
Programs in Python
A program can also be described in Python with the SDK. This one has
two processes: write writes a greeting into a file, and
shout, which reads that file, writes it in capitals.
Connecting the input of shout to the output of
write is all it takes for shout to run after
it. The code of each process is in a file of its own language,
write.sh and shout.py:
from debasher import Process, Program, in_outdir

write = Process("write", code="write.sh", description="Writes a greeting.")
write.cmdline_opt("-name", "string", "who to greet")
write.output("-outf", "file", "the greeting", value=in_outdir("greeting.txt"))

shout = Process("shout", code="shout.py", description="Turns it into capitals.")
shout.input("-inf", "file", "the greeting", source=write["-outf"])
shout.output("-outf", "file", "the result", value=in_outdir("shout.txt"))

prg = Program("greet")
prg.add(write, cpus=1, mem=32, time="00:01:00")
prg.add(shout, cpus=1, mem=32, time="00:01:00")
debasher_build greet.py writes the program as the editor
saves it, which the web interface then opens, and
debasher_exec runs it. The whole example, with the code of
both processes, is in the
README,
and the SDK is described in the
documentation.
Distribution Details
DeBasher has been coded using Bash shell-scripting and Python; its web interface is written in TypeScript, with React, and served by a Python server built on FastAPI. DeBasher is developed on Linux, and is tested on Linux, on macOS and on Windows through WSL2.
It is released under the GNU Lesser General Public License (LGPL), version 3.
Installation
Requirements
- Bash 4.3 or newer, which runs every script of DeBasher.
- Python 3.
- The usual command line tools of a Linux system: those of GNU
coreutils (
realpathandtimeoutamong them),grep,sed,awkandfind, andflock, from util-linux. - Graphviz, whose
dotcommand draws the graphs of programs. - The autotools, to configure the package: autoconf 2.71 or newer and
automake; and
make, to build it. - For the web interface, which is optional: Node.js 22.12 or newer,
with npm, to build it, and a Python virtual environment for its server
(see below). Without
npm,
configureleaves the web interface out, as it does when given--disable-frontend.
Some features need further software (see below).
Linux
On Ubuntu (or Debian), the required packages are installed with:
$ sudo apt install autoconf automake make git graphviz python3 python3-venv
Bash, coreutils and util-linux are part of every installation. The Node.js package of the distribution is usually older than 22.12; a newer one is installed from nodejs.org or with nvm. Other distributions have packages of the same names, or close to them.
Windows
DeBasher runs inside WSL2, the Linux system of Windows, and is tested there with Ubuntu 24.04. WSL2 is installed, with an Ubuntu distribution, from a PowerShell opened as administrator:
> wsl --install
Then, in a terminal of that Ubuntu, follow the instructions for
Linux above. Keep the sources of DeBasher, your programs and their
output directories in the file system of Linux (under your home
directory there), not in the drives of Windows that WSL2 mounts
under /mnt/c: DeBasher creates FIFOs and locks files, which
those drives may not support, and reaching them from Linux is much
slower. The web interface, started inside WSL2, is reached from a
browser of Windows at the address that debasher_webui
prints, since WSL2 forwards the ports of localhost to
Windows.
macOS
The steps below install everything that DeBasher needs, and make the command line tools that it finds behave as those of Linux do. They are the steps with which DeBasher is tested on macOS 15, on Apple silicon. If something fails, please report it on the issue tracker.
-
Install the command line tools of Xcode, which provide
gitandmake:$ xcode-select --install -
Install Homebrew, and with it the rest of the requirements:
 $ brew install bash coreutils findutils gnu-sed grep gawk flock \
     autoconf automake graphviz python node
macOS ships Bash 3.2 and has no
flock, and itssed,grep,findand the tools of coreutils are those of BSD, which differ in details from the GNU ones that DeBasher is tested with. -
Put the Bash of Homebrew and the GNU tools first in the
PATH, under their usual names (Homebrew installs the GNU tools with agprefix,gsedorgtimeout, and keeps the usual names ingnubindirectories), for example in~/.zprofile:BREW="$(brew --prefix)" export PATH="$BREW/opt/coreutils/libexec/gnubin:$BREW/opt/findutils/libexec/gnubin:$BREW/opt/gnu-sed/libexec/gnubin:$BREW/opt/grep/libexec/gnubin:$BREW/bin:$PATH"configuretakes the firstbashof thePATH, which every script of DeBasher then runs with, and refuses one older than 4.3;bash --versionshows which one comes first. -
Build and install the package as described below, and run
make installcheck, which runs the examples of DeBasher and says whether they work.
Mirror taps (the --mirror option
of define_fifo_opt) rely on how Linux and macOS treat a
FIFO opened for both reading and writing. On macOS, a mirror tap whose
reader is gone takes a second longer to stop.
Building and Installing
Once the requirements are available, the package is built and installed with the following steps:
-
Obtain the package using git:
$ git clone https://github.com/daormar/debasher.git cdto the directory containing the package's source code and type./reconf.Type
./configureto configure the package.Type
maketo compile the package.Type
make installto install the programs and any data files and documentation.Optionally, type
make installcheckto check the installation: it runs the example programs with the installed tools.You can remove the program binaries and object files from the source code directory by typing
make clean.
By default the files are installed under the /usr/local
directory (or similar, depending on the OS you use); however, since Step
5 requires root privileges, another directory can be specified during
Step 3 by typing:
$ ./configure --prefix=<absolute-installation-path>
For example, if user1 wants to install the DeBasher
package in the directory /home/user1/debasher, the sequence
of commands to execute should be the following:
 $ ./reconf
 $ ./configure --prefix=/home/user1/debasher
 $ make
 $ make install
The installation directory can be the same directory where the DeBasher package was decompressed.
Starting the Web Interface
The server of the web interface needs the Python packages listed
in share/debasher/api/requirements.txt, under the
installation directory, which make install does not
install. They are installed once, in a virtual environment:
 $ python3 -m venv ~/debasher-venv
 $ ~/debasher-venv/bin/pip install -r <installation-path>/share/debasher/api/requirements.txt
Then, with that environment activated, debasher_webui
starts the server and prints the address of the web interface:
 $ source ~/debasher-venv/bin/activate
 $ debasher_webui
The address carries a token that the server draws when it starts, and every request has to present it, so only whoever has the address can use the server; open it once and the browser keeps the token. The server runs every program as the user who started it and, by default, listens only on the local machine; to reach it from another machine, forward its port over SSH.
Third Party Software
Slurm
DeBasher runs programs under Slurm, the workload scheduler of most high performance clusters.
Conda
A process can declare a Conda environment, which DeBasher creates and activates for it.
Docker
A process can run in a Docker container, for reproducible results.
Sample Projects Using DeBasher
Geno-DeBasher: Geno-DeBasher is a bioinformatics software project implementing DeBasher modules related to genome variant calling.
Documentation and Support
Project documentation includes:
- These instructions.
- Technical documentation: how to execute and implement programs, resident programs, the web interface, the tools of DeBasher and its API, with examples.
- A journal paper.
DeBasher has been described in a journal article. This article incorporates a supplementary file with multiple DeBasher code examples.
If you need additional help, you can:
Citation
If you use DeBasher in your research, please cite the following publication:
Ortiz-Martínez, D. DeBasher: a flow-based programming bash extension for the implementation of complex and interactive workflows with stateful processes. BMC Bioinformatics 26, 106 (2025). https://doi.org/10.1186/s12859-025-06108-1